APIC Dev Jam Lab 5 - Advanced API Assembly
In the previous labs, you have been working with an API that acts as a pass-through to a microservice application.
In this lab, you will expand the product offerings for ThinkIBM. In addition to the Inventory API, ThinkIBM wishes to provide APIs that offer financing and shipping logistics to consumer applications. Your goal is to utilize existing enterprise and public assets to create these API offerings.
In this tutorial, you will explore the following key capabilities:
-
Create a new API, including object definitions and paths.
-
Configure an API to access an existing SOAP service.
-
Import an existing API from an OpenAPI definition document (a.k.a Swagger).
-
Map data retrieved from multiple API calls into an aggregate response.
-
Use GatewayScript directly within an API assembly.
APIC Dev Jam Series
The APIC Dev Jam Series is a hands-on workshop with lab exercises that walk you through designing, publishing, and securing APIs. This workshop is for API developers, architects, and line of business people who want to create a successful API strategy. There are 8 labs and each is 30 minutes long. Make sure you choose enough time in your reservation to get through all the labs!
[NOTE: ][This demo environment contains a full API Connect installation in Cloud Pak for Integration. The login information to the APIC cluster will be sent in a separate email when you reserve the instance. Use Google Chrome, Firefox or Microsoft Edge to access the cluster using the credentials supplied. Make sure you login using API Manager User Registry not Common Services registry.]
Lab 1 : Create and Secure an API to Proxy an Existing REST Web service
Lab 2 : The Developer Portal Experience
Lab 3 : Add OAuth Security to your API
Lab 4 : Use Lifecycle Controls to Version Your API
Lab 6: Working with API Products
Lab 7: The Consumer Experience
Lab 8: Create and test GraphQL Proxy API
Prerequisites: Labs 1-4
Create and Define the Financing API (REST to SOAP)
ThinkIBM wants to give its customers the ability to calculate financing payments. There is already a legacy SOAP-based application which will do the calculation, but it should be exposed to consumers as a modern RESTful API. In this section, you will create a new OpenAPI definition for the financing API.
-
From the left navigation menu, click [Develop.]
-
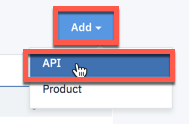
Click [Add] and choose [API].

- Select [New OpenAPI] and click [[Next.]]

- Fill in the form for Create New OpenAPI with the following values:
[Title: financing]
Name: financing
Base Path: /financing
Version: 1.0.0
Click **Next**.

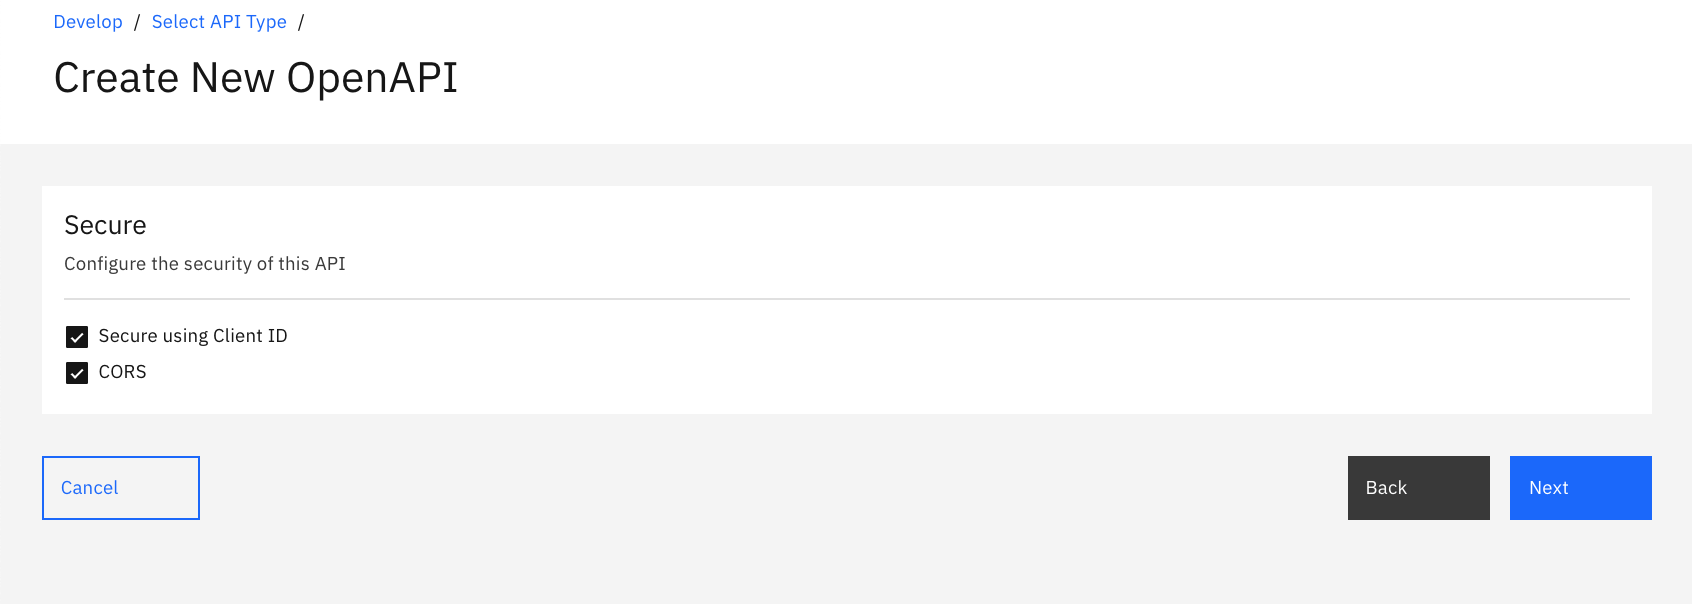
-
Leave all default values and click [[Next. ]]API Connect will generate a new OpenAPI definition for the financing API and provide a summary with the performed activities.
-
Click [Edit API ]to customize the API.**
-
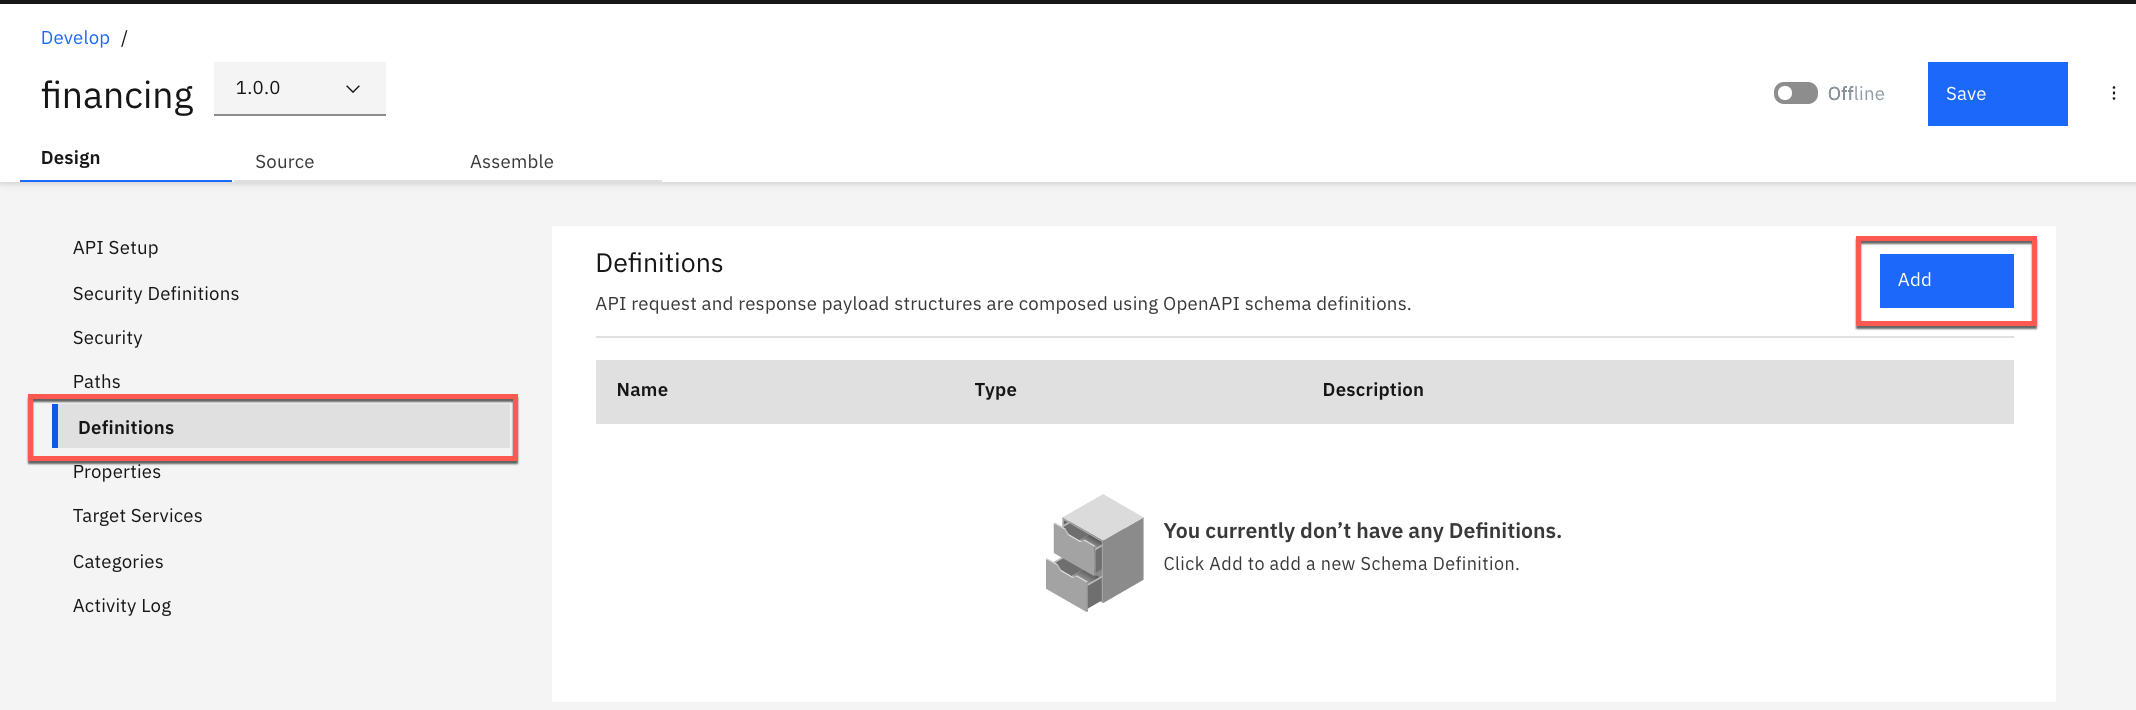
Create the model definition for the new API. These definitions are used in a few places. Their primary role is to serve as documentation in the developer portal on expected input and output parameters. However, they can also be used for data mapping actions. Click [Definitions] from the API Designer menu on the left. Then, click [Add] to create a new definition.
-
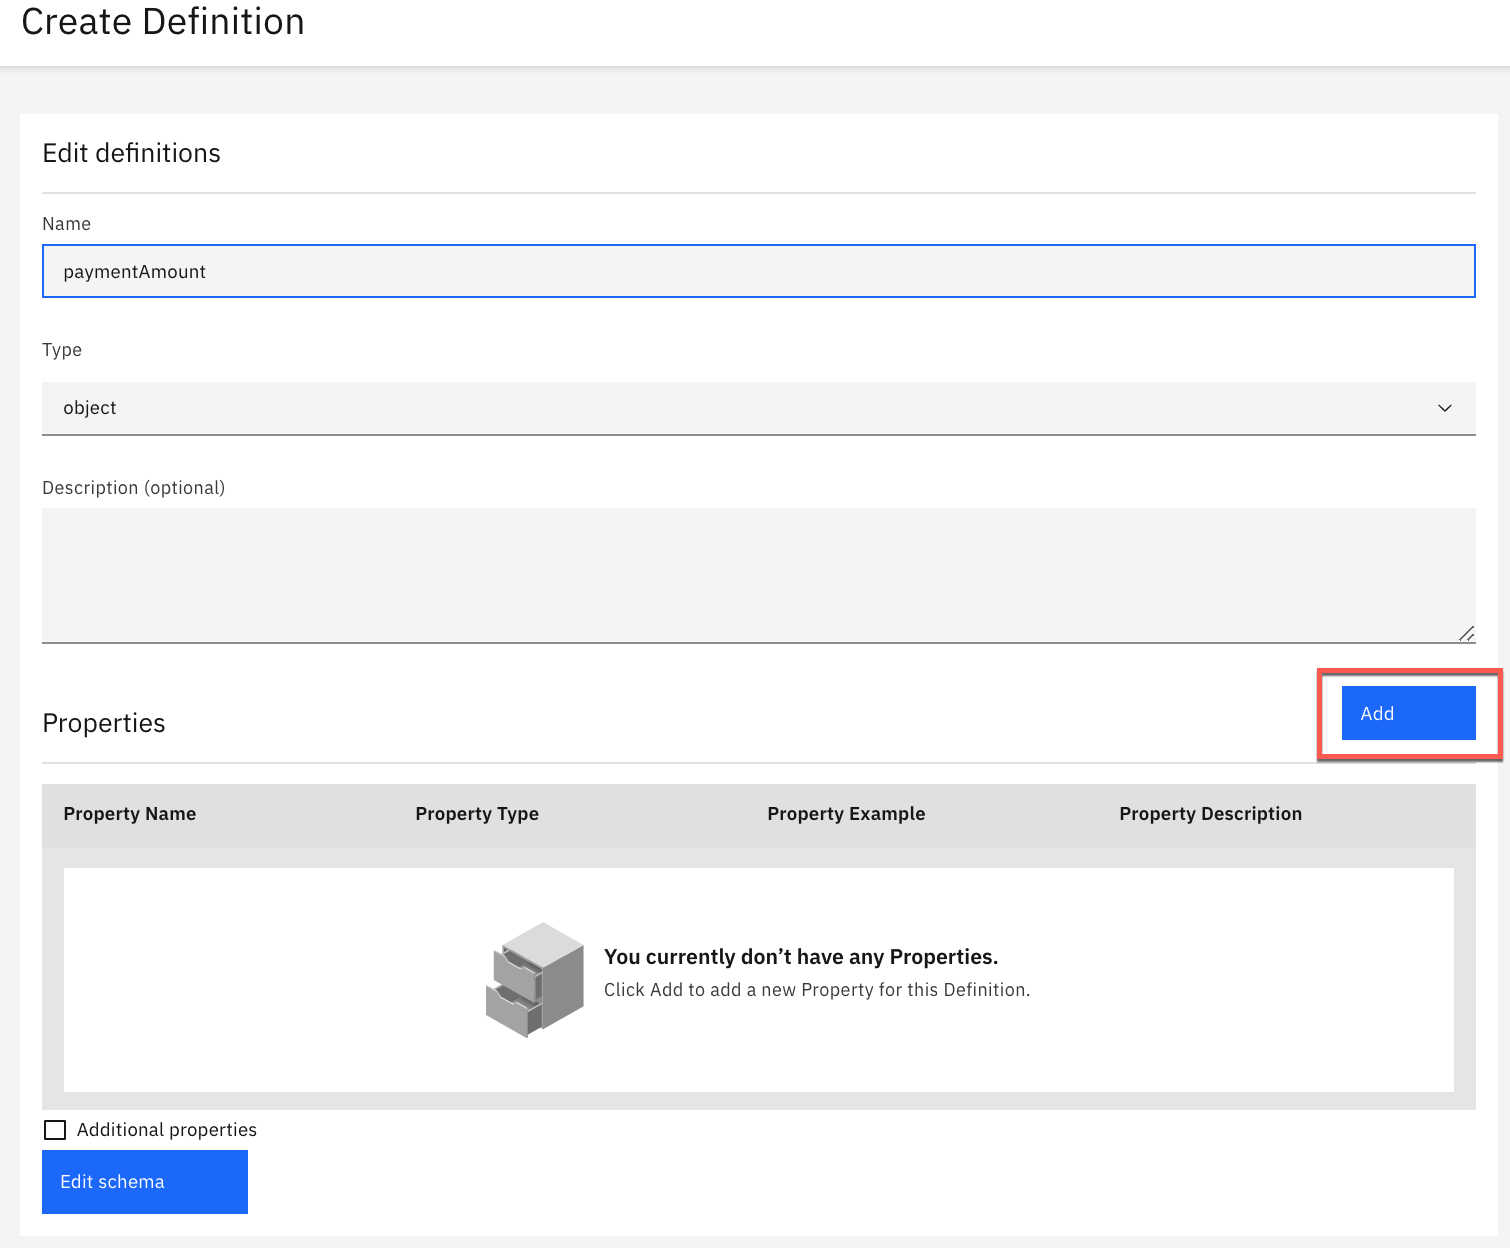
Enter [paymentAmount] for [Name] and leave the definition [Type] set to [object].
-
Click [Add] in the [Properties] section.
-
Edit the property values using the following values:
Property Name: paymentAmount
Type: float
Example: 199.99
Description: Monthly payment amount
The page will look like this:
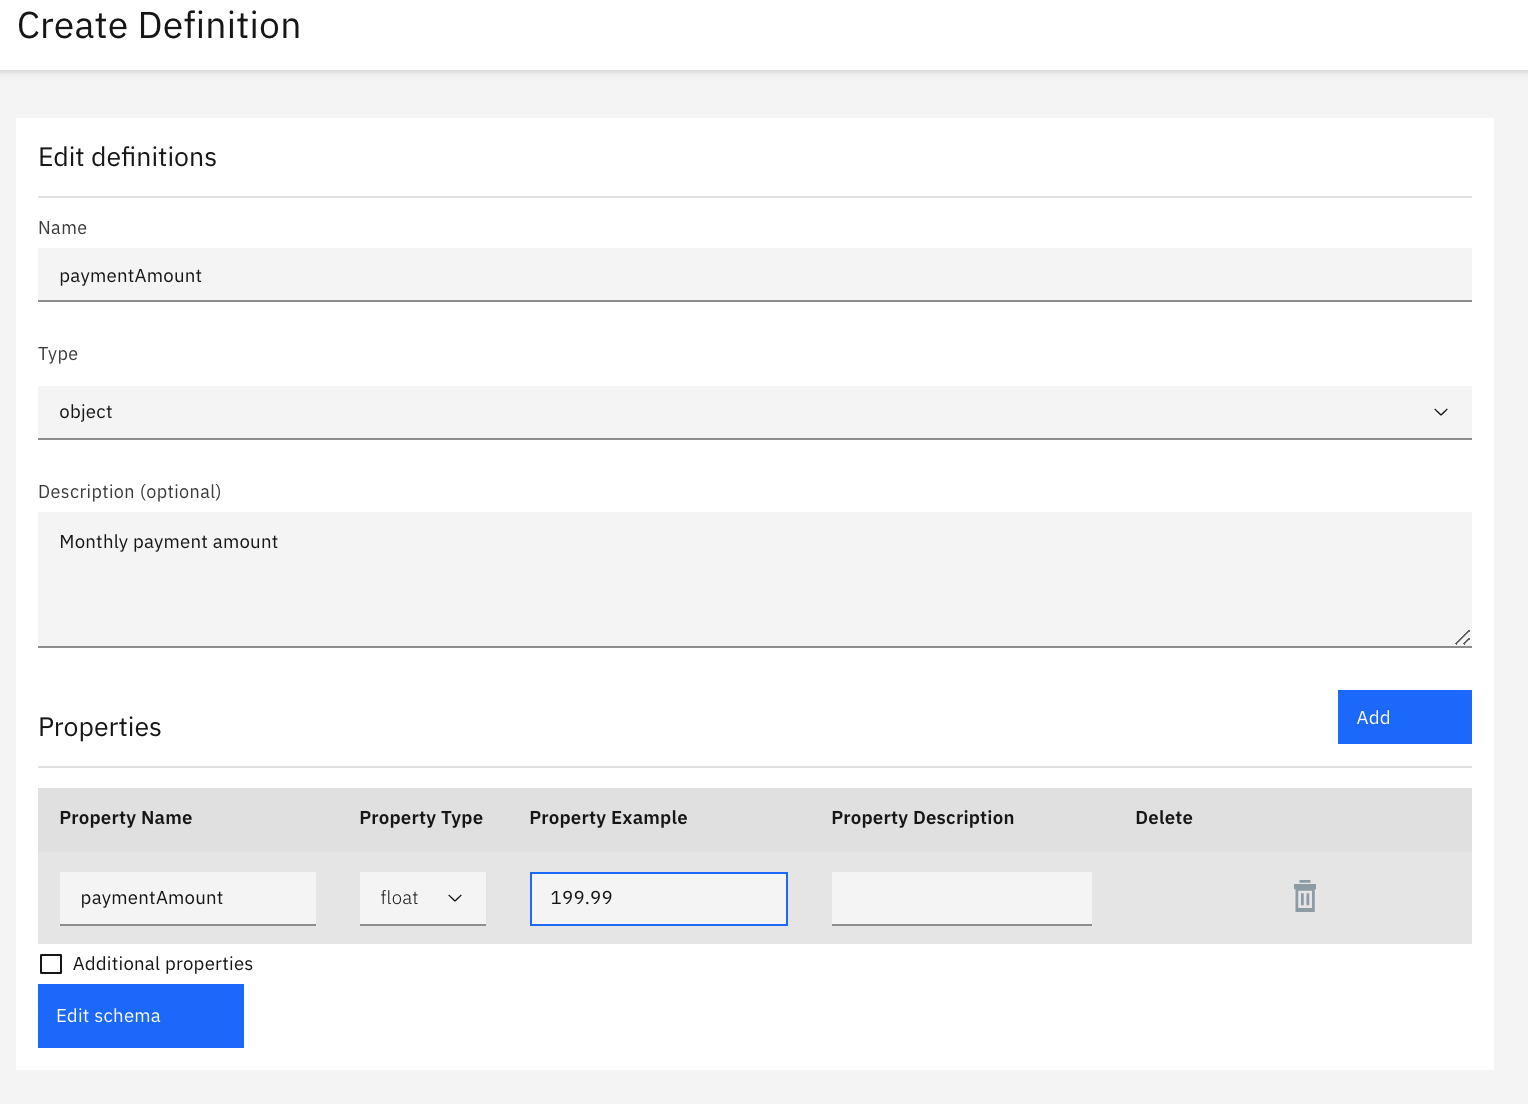
The property will be utilized in the Path you create next.
Click **[Save]** to go back to the main API
Editor.
-
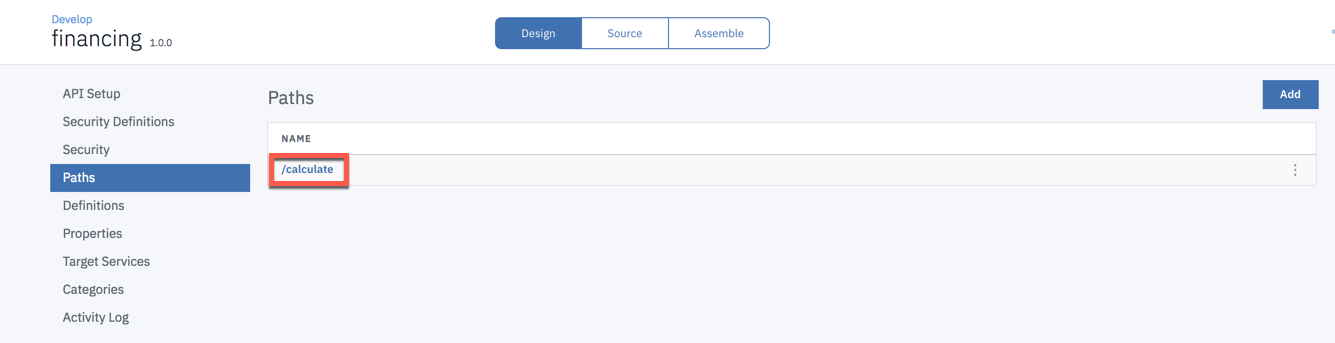
Click [[Paths]] in the navigation menu on the left. Then click [Add] to create a new path.

-
The Path screen is loaded. Edit the [[Path name]] to be [/calculate]. [Note:] [Recall that our Base Path for this API is `financing`. This new path will be appended to the base, creating a final path of /financing/calculate.]**
-
Click [[Add]] in the Operations section to define the operation to support under the path.

-
From the [Add Operation] menu, select the [Get] operation and then click [Add].

-
Click [Save]. You will be redirected to the main API Editor to continue.

-
Click the [/calculate] path we just created.
-
Click the [GET] operation to add the request parameters. This defines the input to the API request. Since this is a GET request, you will add the required request parameters to the query component of the URI.

-
Scroll down to the Parameters section within the operation config. Click [[Add]] in the [[Parameters]] section. You are actually going to need three total parameters for this operation, so go ahead and click the `Add` button two more times to add the parameter templates.

-
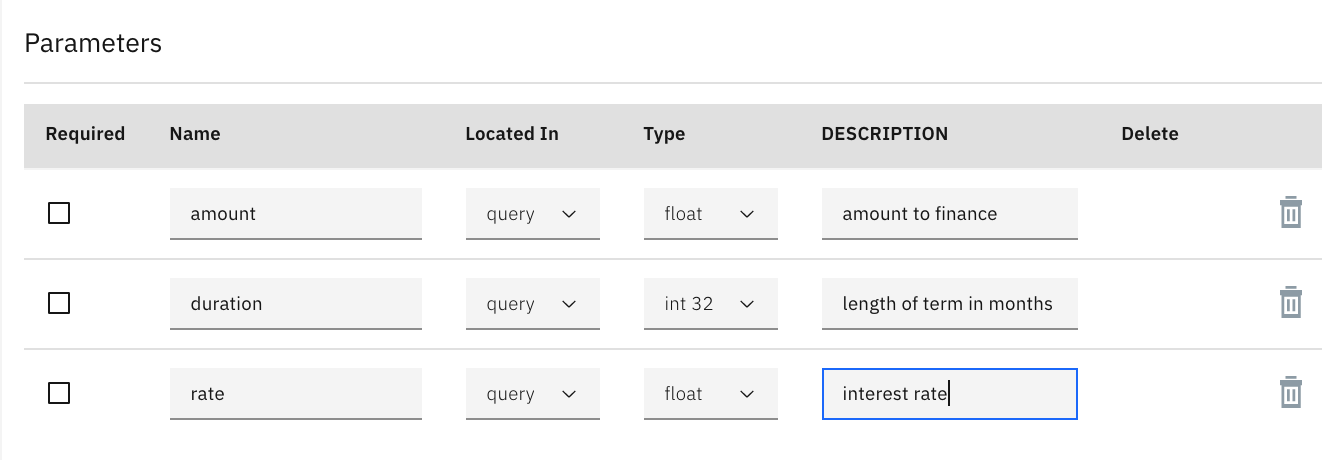
Edit the parameters to set the values:
  **Required**   **Name**   **Located In**   **Type**   **Description**
  -------------- ---------- ---------------- ---------- --------------------------
  yes            amount     Query            float      amount to finance
  yes            duration   Query            int 32     length of term in months
  yes            rate       Query            float      interest rate
Once you have entered the values, the screen will look like this:
-
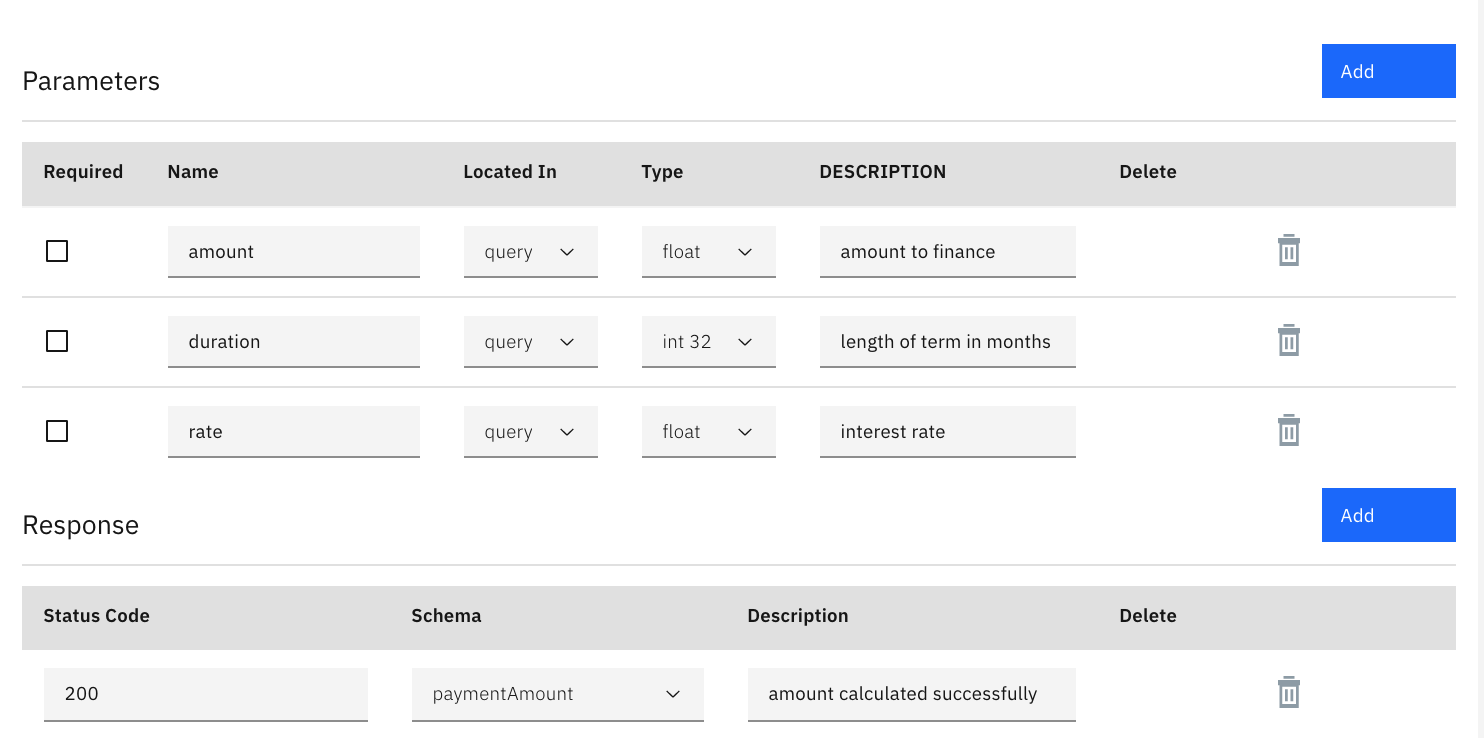
Set the schema for the response. Click Add in the [Response] section. Enter [[200]] for [[STATUS CODE]]. Since we already defined the [paymentAmount] definition, select it from the drop down list for [[SCHEMA]]. You will find the [paymentAmount] definition at the bottom of the list. For [[DESCRIPTION]] enter [[amount calculated successfully]]
-
Click [[Save]] to save the API definition.

Map the API to a Service WSDL
Import the legacy Financing SOAP service WSDL and map it to the RESTful API definition.
Attach a Service WSDL
-
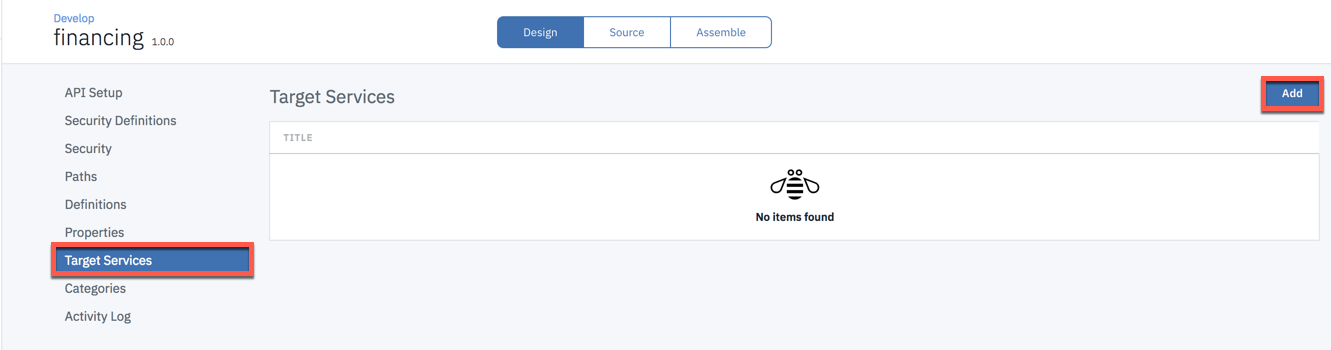
Click the [Target Services] option in the left column menu palette from the [financing 1.0.0] API Design screen
-
Click [Add] to import the web service from the legacy financing service.
-
Download the calculate.wsdl and then Click [Browse] to select [[calculate.wsdl]] located in where you downloaded it on your machine.
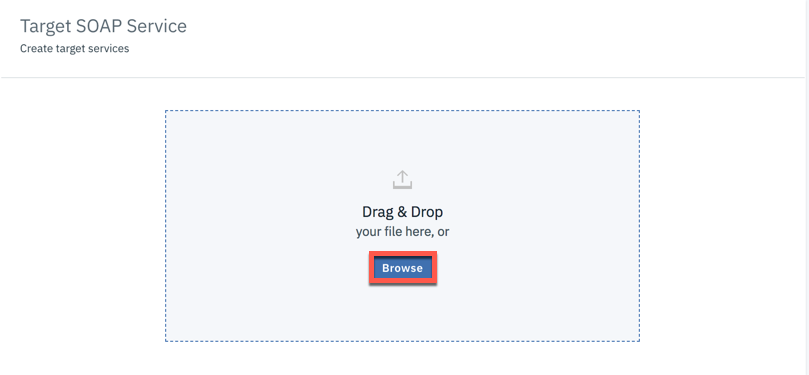
You will get a success message and the service included in the WSDL will be displayed.

-
Select [financingService.] Then click [Submit].
Build the Financing API Assembly
-
Click [[Assemble]] to access the assembly editor.

-
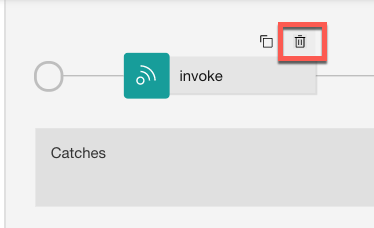
In the processing pipeline, mouse over the [[invoke]] policy and click the [[trashcan]] icon to delete it.
-
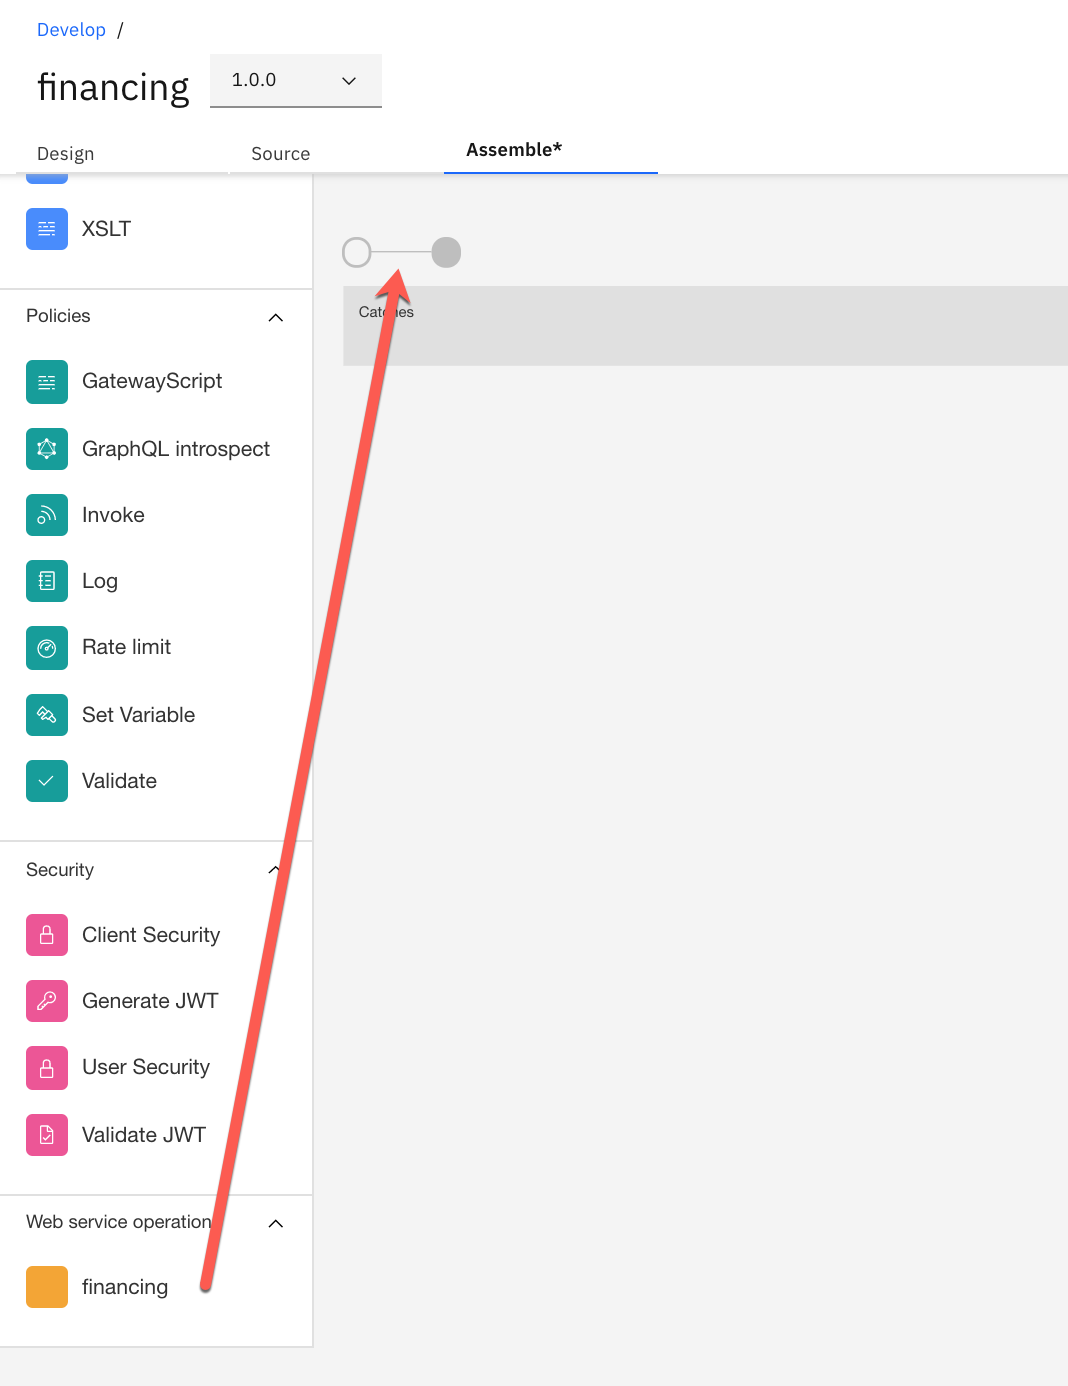
Scroll down to the bottom of the policy menu and drag and drop the [financing web service operations] to processing pipeline.
-
Now you are going to modify the input and output map policy for mapping your REST API into SOAP.

-
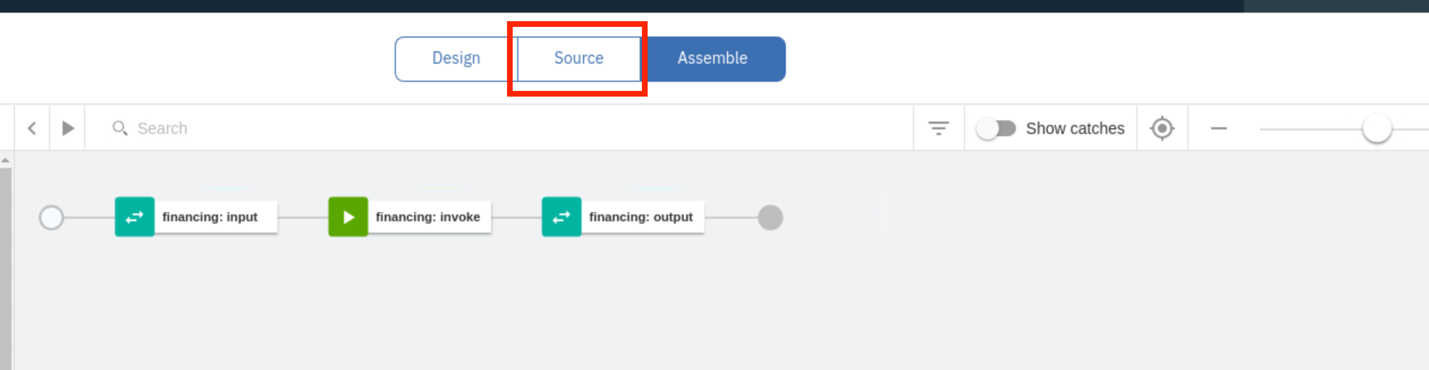
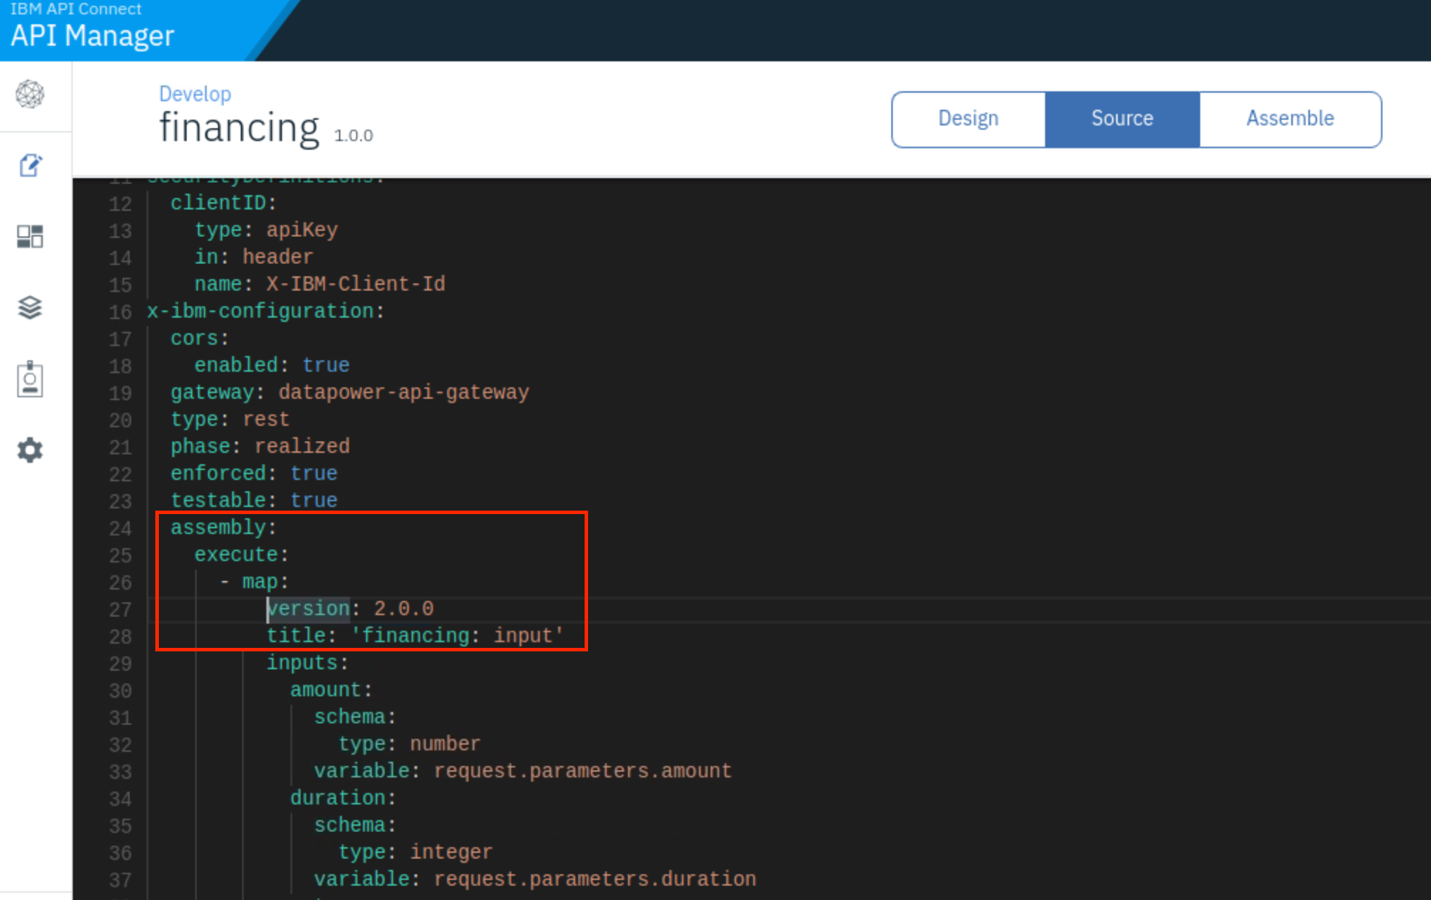
Since we are using the new API Gateway, we will need to instruct it to use the newer version of the policies in the flow (map, invoke, map). Click Source to go to the OpenAPI definition of your API.
-
Scroll down to map and insert [[version: 2.0.0]] right below it.
-
Scroll down to invoke and insert [[version 2.0.0]] right below it. Skip if the version 2.0.0 is already populated.

-
Now go to the last map and insert [version: 2.0.0] right below it. Click [[Assemble]] to go back to the gateway flow designer. Skip if the version 2.0.0 is already populated.

-
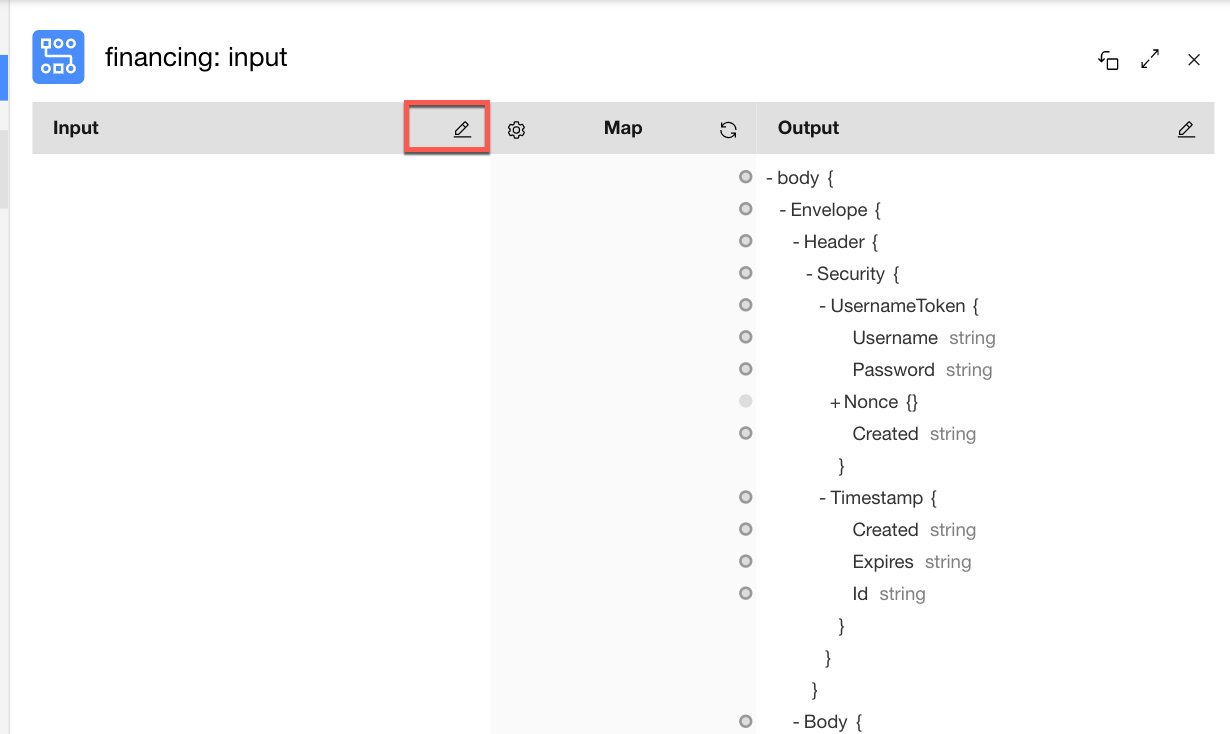
In order to consume a SOAP-based service from your REST-based API, you need to map the query parameter inputs that were previously defined as part of the GET /calculate operation to a SOAP payload. To do so, click the [[financing input]] map policy on our pipeline to open the map editor.
[[Tip: Click on the `+` icon to make the editor window fill the screen.]]
-
Click on the [[pencil icon]] in the [[Input column]].
-
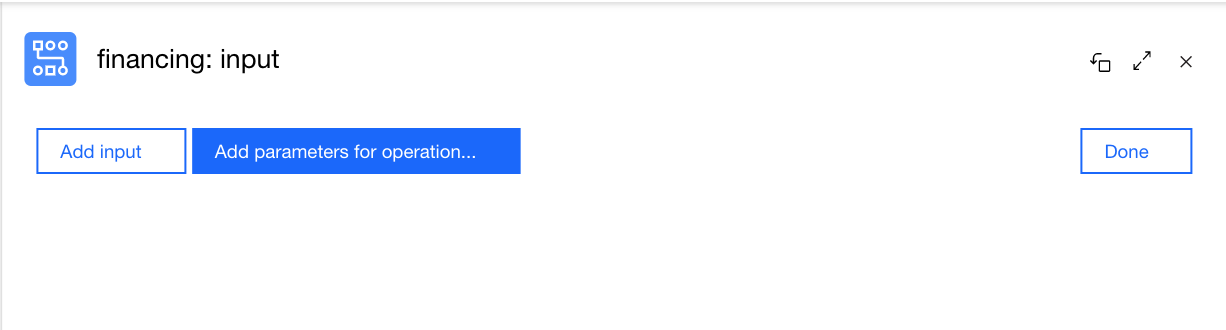
Click [[+ parameters for operation...]] and select the [GET Calculate operation].
The Map editor will automatically pull in the request parameters that you defined earlier.
-
Click [Done] to return to the map editor.
-
For each of the Input query parameters, map them to their respective SOAP Output elements.
To map from an input field to an output field, click the circle next to the source element once, then click the circle next to the target element. A line will be drawn between the two, indicating a mapping from the source to the target.

-
Click [[`X`]] in the map editor to return to the policy pipeline.
-
Click the [[invoke policy]] to open its editor.
-
The SOAP service URL has already been set for you during the service import when we create the API.

-
Click [[`X`]] to return to the policy pipeline.
-
After the Financing Web Service is invoked, you need to map the SOAP response into a JSON object.
You already defined the response object called [[paymentAmount]]. To do the map, click the [financing output] map policy on the pipeline to open the map editor.
-
Click the [[pencil icon]] to set the output object schema.
-
Click the [+ outputs for operation...] option and select the [[GET /calculate operation]].
-
Set the [[Content type]] configuration option to [[application/json]], and then click [[Done]] to return to the map editor.

-
Click the [[circle next to the paymentAmount source element]] once, then click the [[circle next to the target element]]. A line will be drawn between the two, indicating a mapping from the source to the target.

-
Click [[`X`]] in the map editor to return to the policy pipeline.
-
Click [[Save]] the API definition.
-
Click [Develop] in the navigation menu to return to the list of APIs and Products in your system.

Import Logistics API
In this lab section, we will be adding a new API called logistics which will provide helper services around calculating shipping rates and locating nearby stores. Rather than require you to build the entire API from scratch again, you will see how you can import and modify an existing OpenAPI definition.
Import the OpenAPI Definition
-
Click [Add] and select [API.]
-
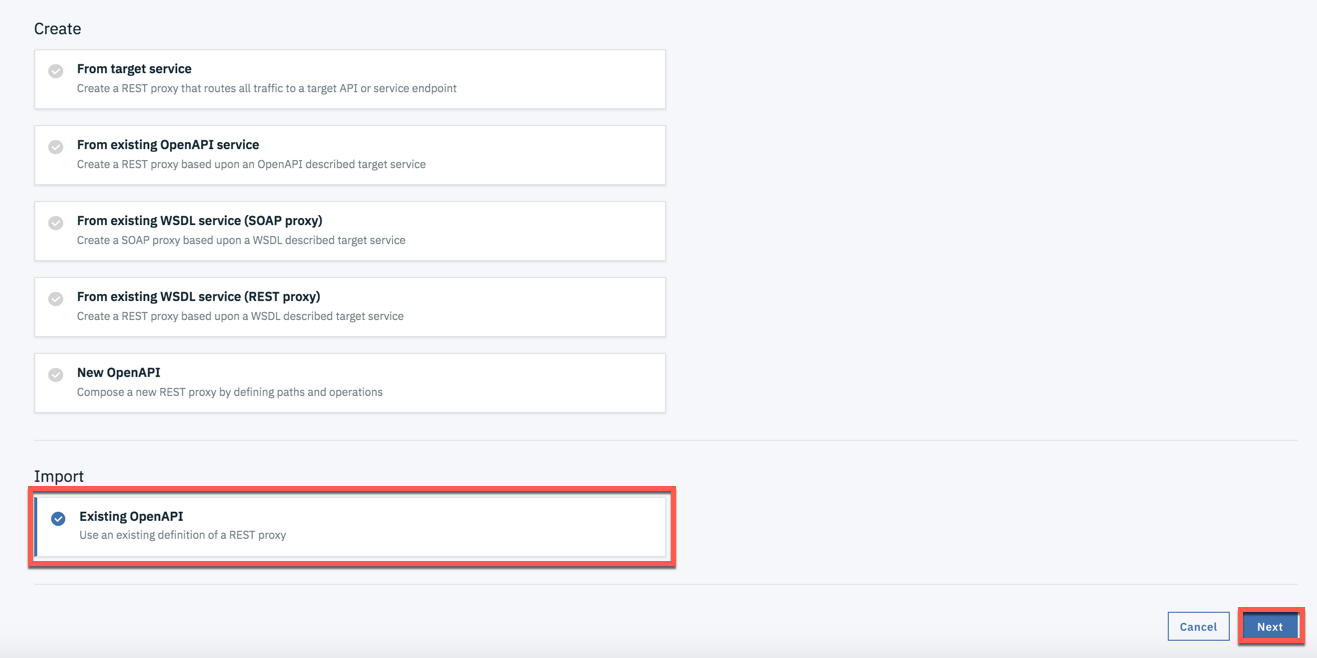
From the Create API wizard, select [[Import: Existing OpenAPI]]. Then click [[Next]].
-
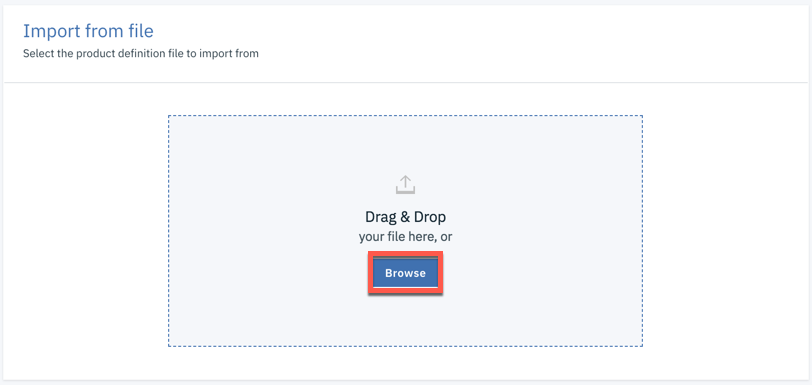
You will need logistics.yaml file for this step. Fron another browser window download the file using this link logistics.yaml
Click `Browse` in the [[Import from file]] window, and select the downloaded logistics.yaml file.
-
Click [[Next]] in the confirmation window.
-
Click [[Next]] one more time [[without selecting the option Activate API]] since we still need to make some updates.
-
Click [[Edit API]] in the [[Summary]] page to go to the API editor.
Configure payload to be stored in Analytics
-
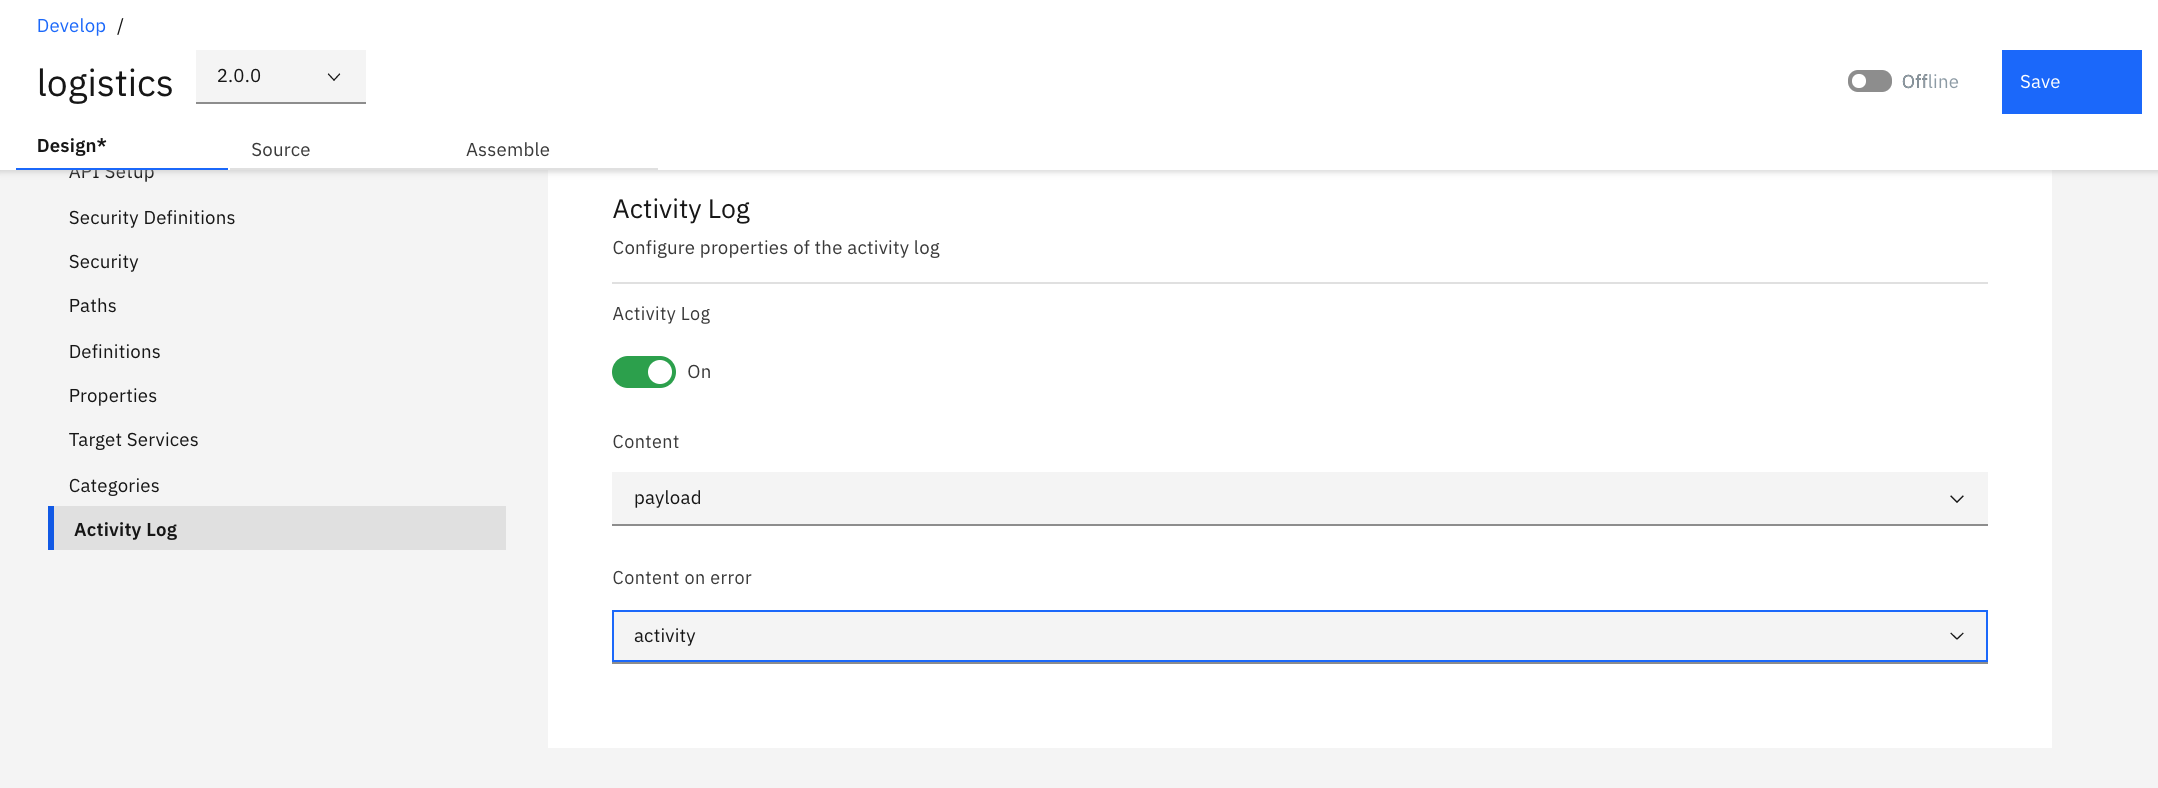
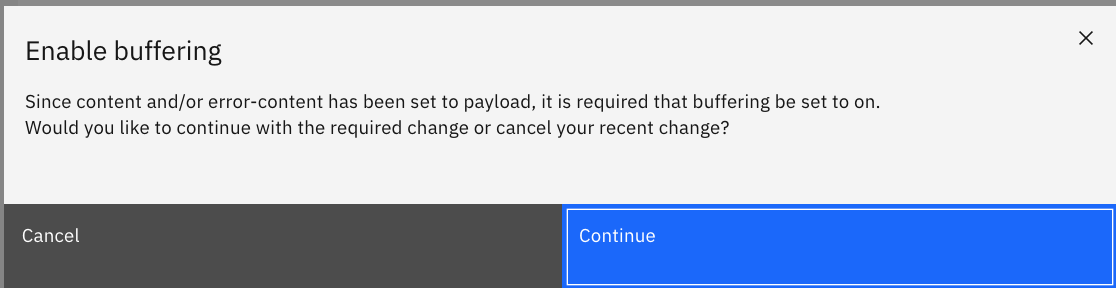
From the API menu, select [[Activity Log]]. In the [[Content]] drop-down, select [[payload]]. A pop up window will be displayed, asking to enable buffering. Click [[Continue]].
-
Set the [[Content on error]] drop-down to [[activity]]. Click [[Save]].
Create an Orchestration Assembly
The logistics API provides resources for calculating shipping costs and locating the nearest store for pickup. In this section, you will configure the assembly for the shipping calculation resource. Your API assembly will call out to two separate shipping vendors and provide a consolidated response back to the consumer.
Create the Logistics API Assembly
-
Switch to the [[Assemble]] tab and remove the [[invoke]] policy by hovering over it and selecting the [[trashcan icon]].
-
Click and drag the [[Operation switch]] policy to flow pipeline in the right.
-
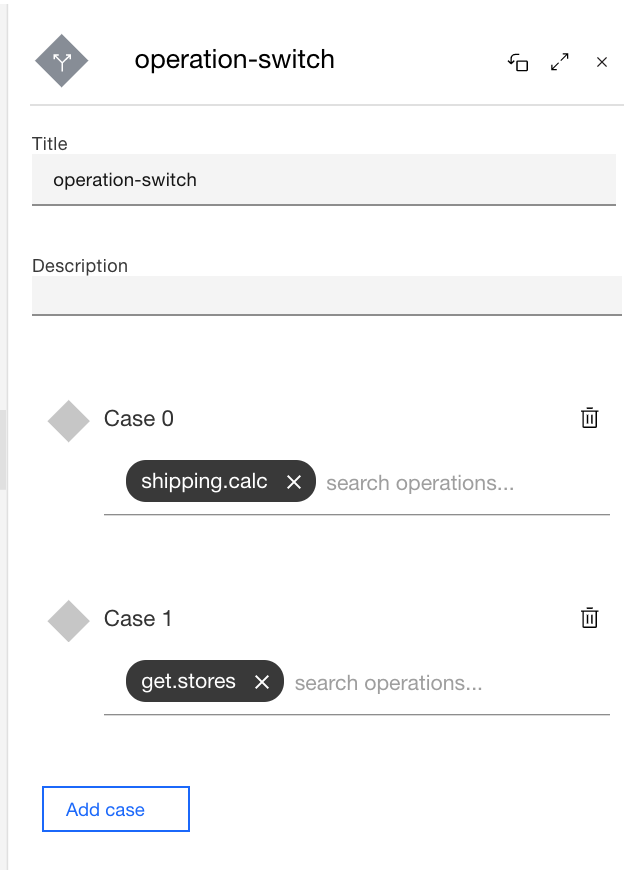
The switch editor will open with a single case with case 0 created by default.
-
Next to case 0, click [search operations...] to show the drop-down list of available operations.
-
Select the [shipping.calc] operation.
-
Click the [+ Case] button to add a second case for the [[get.stores]] operation.
-
Click [X] to close the operation switch configuration editor and then click [[Save]]. You should see two new processing pipelines created on your `operation-switch` step - one for each case:
Configure the shipping.calc Case
This operation will end up invoking two separate back-end services to acquire shipping rates for the respective companies, then utilize a map action to combine the two separate responses back into a single, consolidated message for our consumers.
-
Add an [[invoke policy]] to the [[shipping.calc case]].
-
Edit the [invoke] action with the following properties:
-
[[Title: invoke_xyz]]
-
[[URL: $(shipping_svc_url)?company=xyz&from_zip=90210&to_zip={zip}]]
-
[[Stop on error: unchecked]]
-
[[Response object variable (scroll to the bottom): xyz_response]]


-
[Note: The parameter provided here is a reference to the zip parameter defined as input to the operation. The portion of the URL will get replaced by the actual zip code provided by the API consumers. ]
-
-
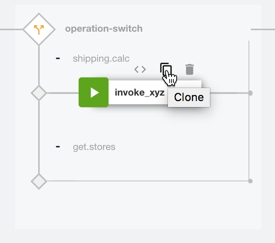
Hover over the [[invoke_xyz policy]] and click [[clone]] to add another invoke action:
-
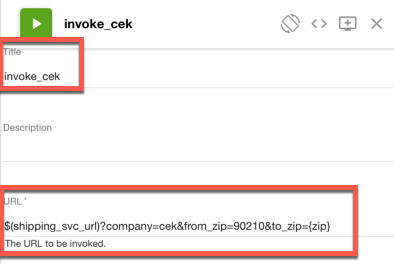
Edit the new invoke policy with the following properties:
-
[[Title: invoke_cek]]
-
[[URL: $(shipping_svc_url)?company=cek&from_zip=90210&to_zip= ]]
-
[[Response object variable: cek_response]]
-

-
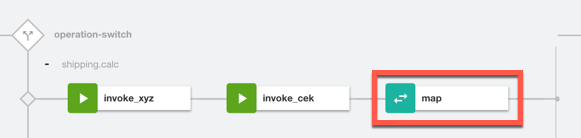
Add a [[map policy]] after the last invoke and then click it to open the editor.
-
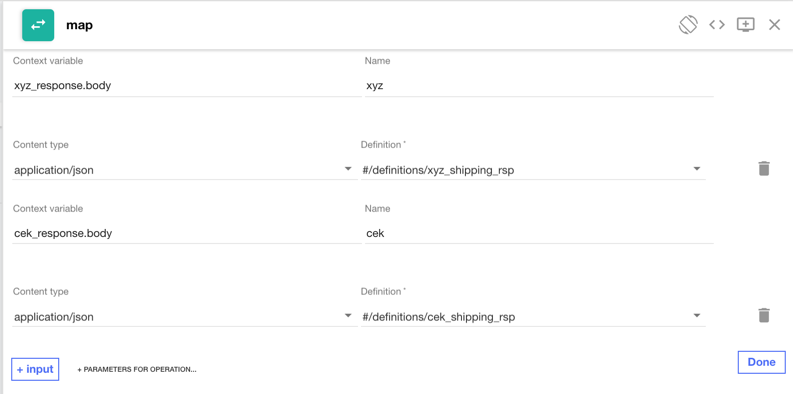
Click the [[pencil]] at the top of the Input column, then click on the [[+ input]] button. Enter the following input configuration:
-
[[Context variable: xyz_response.body]]
-
[[Name: xyz]]
-
[[Content type: application/json]]
-
[[Definition: #/definitions/xyz_shipping_rsp]]
-
-
Click the [[+ input]] button again to add another input. Specify the following input configuration:
-
[[Context variable: cek_response.body]]
-
[[Name:cek]]
-
[[Content type: application/json]]
-
[[Definition: #/definitions/cek_shipping_rsp]]
-
-
You now have two inputs assigned to the map policy:
-
Click [[Done]] to return to the editor.
-
Click the [[pencil icon]] at the top of the [[Output]] column and then click [[+ outputs for operation...]] and choose the [[shipping.calc]] operation.
-
Set [Content type] to [[application/json]].
-
Click [[Done]] to return to the editor.
-
Complete the mapping. To map from an input field to an output field, click the circle next to the source element once, then click the circle next to the target element. A line will be drawn between the two, indicating a mapping from the source to the target.
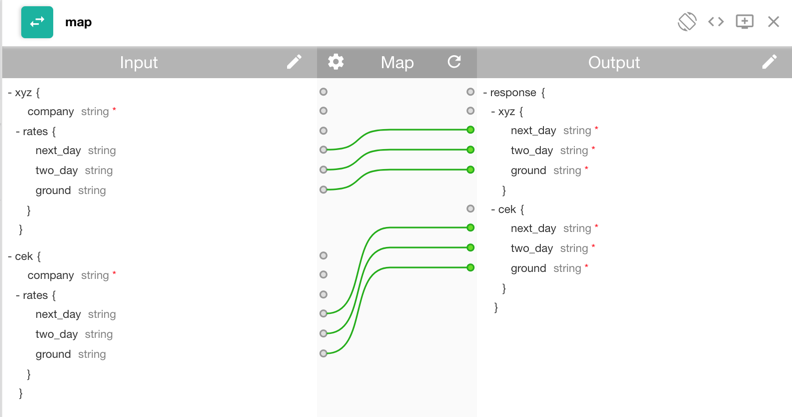
-
Click X to close the map editor. Your assembly policy for the shipping.calc operation is now complete.

-
Save your changes.

Use GatewayScript in an Assembly
In this section, you will configure the assembly for the store locator resource. You will use GatewayScript to modify the response to your consumers, providing them a maps link to the nearest store location.
Configure the get.stores Case
This operation will call out to the Google Geocode API to obtain location information about the provided zip code, and will then utilize a simple gatewayscript to modify the response and provide a formatted Google Maps link.
-
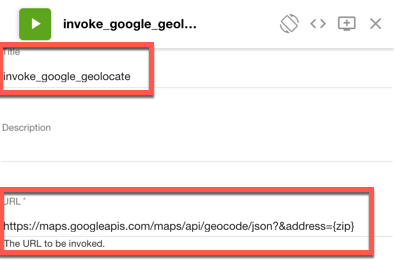
Add an invoke policy to the [[get.stores case]].

-
Edit the new [[invoke action]] with the following properties:
-
[[Title: invoke_google_geolocate ]]
-
[[URL: https://maps.googleapis.com/maps/api/geocode/json?&address=]]
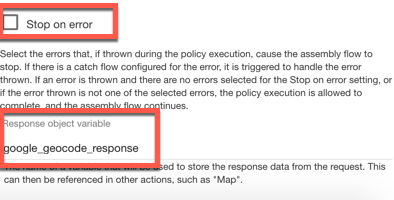
-
[[Stop on error: unchecked ]]
-
[[Response object variable (scroll to the bottom): google_geocode_response]]
-
-
Click [[X]] to close the invoke editor.
-
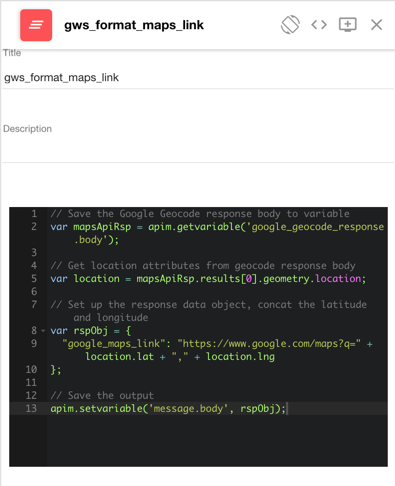
Add a [[gatewayscript policy]] with the following properties:
-
[Title: gws_format_maps_link]
-
Copy the following GatewayScript snippet and paste it into the text area:
-
// Save the Google Geocode response body to variable
var mapsApiRsp = apim.getvariable('google_geocode_response.body');

// Get location attributes from geocode response body
var location = mapsApiRsp.results[0].geometry.location;

// Set up the response data object, concat the latitude and longitude
var rspObj = {"google_maps_link": "https://www.google.com/maps?q=" + location.lat + "," + location.lng};

// Save the output
apim.setvariable('message.body', rspObj)
-
[Note: Take a quick look at line 5. Notice how our gateway script file is reading the body portion of the google_geocode_response variable which was assigned to the output of the invoke action.]
Click [[X]] to close the gatewayscript editor.
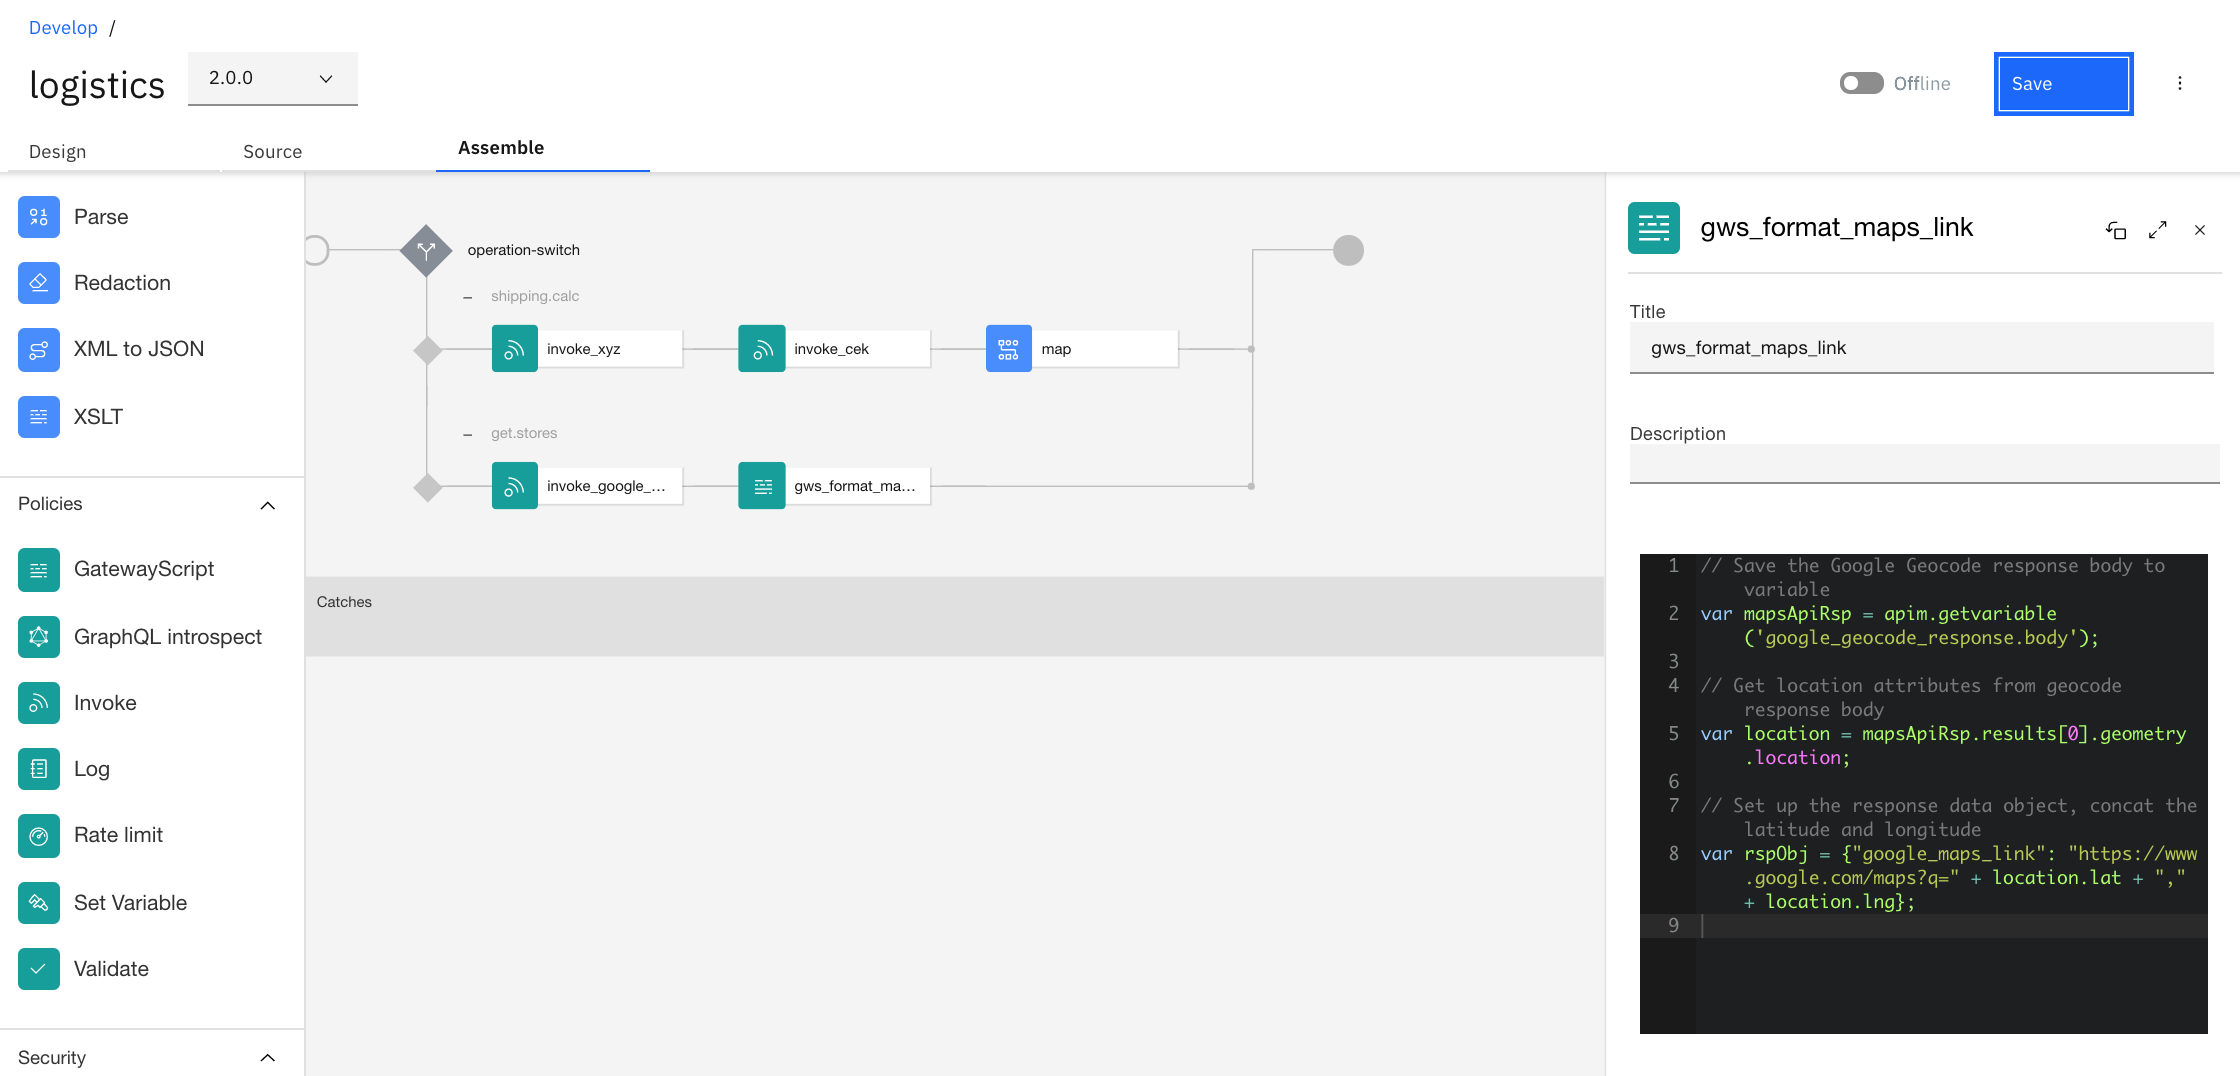
Your assembly for the `logistics` API will now include two separate operation policies:
-
Save your changes.
-
Click [[Develop]] in the navigation menu to return to the list of APIs and Products in your system.
Summary
Congratulations! You have successfully configured two new API’s with advanced assemblies. Throughout the tutorial, you explored the key takeaways:
-
Create a new API, including object definitions and paths.
-
Configure an API to access an existing SOAP service.
-
Import an existing API from an OpenAPI definition document (a.k.a Swagger).
-
Map data retrieved from multiple API calls into an aggregate response.
-
Use GatewayScript directly within an API assembly.
Continue with the APIC Dev Jam! Go to APIC Dev Jam - Lab 6 - Working with API Products)] to learn about bundling the API’s into a Product and publishing it to the consumer portal.